 Add Row
  Add
Add 

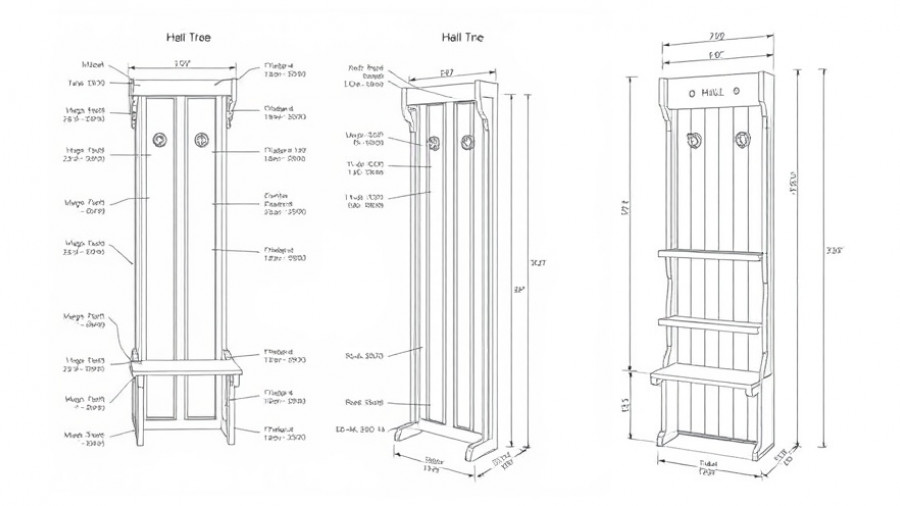
Transform Your Entryway with a Stylish Hall Tree
Picture a stunning entryway—a space that not only welcomes you but also provides practical storage solutions. Building a hall tree is an excellent project for anyone looking to make a stylish yet functional addition to their home. This guide will walk you through creating your very own entryway hall tree, merging clean lines with thoughtful design. You can enjoy the benefits of a well-organized entryway while showcasing a piece of contemporary craftsmanship.
Why Build a Hall Tree?
A hall tree serves as the perfect multi-functional furniture piece to ease your daily routines. It offers a designated space for coats, bags, and shoes, creating a clutter-free environment. Moreover, hall trees can be tailored to fit your unique space and style preferences, whether that’s modern, rustic, or traditional.
Essential Tools and Materials
Before you dive into building, clarify your plan and gather essential tools and materials. For this entryway hall tree project, you’ll need:
- Plywood of your choice – walnut ply works beautifully for a sophisticated finish.
- A range of essential tools, including a miter saw, drill/driver, brad nailer, and clamps.
- Wood screws and wood glue for sturdy assembly.
- Your choice of finish, such as wipe-on polyurethane for a sleek look.
Getting Started: Cutting List and Assembly
Every great project begins with a clear starting point. First, outline your cutting list based on the design specifications of your hall tree. You will have various parts, including the seat cabinet top, side dividers, and fixed shelves. Create a cutting plan to streamline the assembly process, which will allow you to work efficiently.
Once you have your pieces ready, begin assembling them layer by layer. The basic structure includes building the cabinet first. Secure the frames with pocket-hole screws. Don’t forget to pay attention to alignment—it will make a difference in the final appearance.
Finishing Touches
The final steps are what truly elevate your hall tree. Sand all surfaces to achieve a smooth finish. After that, choose how you want to finish your wood. Whether you opt for painting or a clear coat, make sure to allow for ample drying time. Consider adding crown molding or decorative touches that resonate with your style.
Accessorize your hall tree with hooks for coats and bags, introducing a personalized touch that enhances its functionality!
Customization: Making It Your Own
This project provides a base to start from, but the beauty lies in how you can tailor it to suit your taste. If you enjoy working with wood, consider adding features such as built-in LED lighting, drawer storage for small items, or a shoe cubby. Not only does this enhance functionality, but it also adds character to your space. Each customization will breathe life into the hall tree and make it a unique centerpiece.
Inspiration from Other Designs
While you may follow a specific plan for your hall tree, reviewing different styles can inspire additional ideas. For instance, consider exploring the farmhouse style with its rustic charm or a minimalist design that emphasizes simplicity and function. Websites like Ana White and family handyman provide free designs that showcase various options for incorporating hall trees in your home.
Ready to Dive In?
Building your own entryway hall tree not only enhances your space but also provides a profound sense of accomplishment. So roll up your sleeves and gather your tools—your dream of a sophisticated entryway is just a project away! Not only can a well-built hall tree improve organization, but it also adds a touch of artistry to your home’s entrance.
Whatever you choose to add, make it personal and give your entryway a unique charm that reflects your style!


Write A Comment