Add Row
Add Element
cropper
update
Pro Home Guides
update
Add Element
  • Home
  • Categories
    • Home Design & Inspiration
    • Home Renovation & Project Planning
    • DIY Home Improvement & Repairs
    • Pro Contractor Insights & Business Growth
    • Technical Tips & Best Practices
    • Outdoor Living
June 28.2025
3 Minutes Read

Mastering Horseradish Harvesting: Essential Tips for Flavorful Roots

Close-up of freshly harvested horseradish roots.

Unlocking the Secrets: The Right Time to Harvest Horseradish

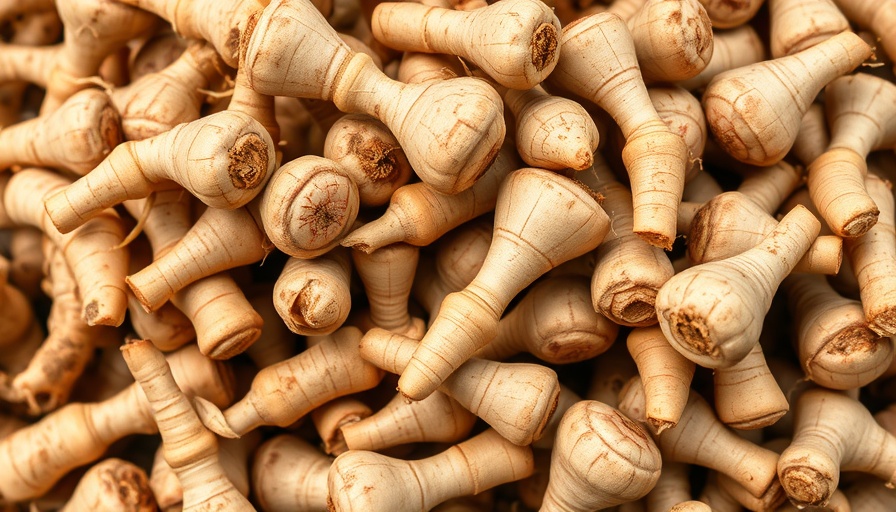
Harvesting horseradish involves more than simply uprooting the plant; timing plays a crucial role in maximizing the quality and flavor of this distinctive root vegetable. Horticulture experts highlight that the ideal moment for harvest occurs post the first hard frost when the ground is still workable. Elizabeth Ann Wahle, Ph.D., emphasizes the importance of patience, stating that premature harvesting can lead to undersized roots lacking the robust flavor characteristic of mature horseradish. Ideally, gardeners should aim to harvest their horseradish in the fall, just before winter settles in and the soil hardens.

Manual vs. Mechanical: Choosing Your Harvesting Method

When it comes to harvesting horseradish, the method of extraction can significantly impact the quality of the root. The majority of home gardeners opt for manual digging techniques, using tools like garden forks, which allow for careful and deliberate extraction of the roots. Meanwhile, large-scale producers may utilize mechanical methods that can be more efficient but risk damaging the roots if not performed correctly. The key, according to expert Linda Langelo, is to loosen the soil around the plant without fracturing the root itself—one foot away from the plant's base is recommended for effective digging.

Harvesting Tips for Success: Do's and Don'ts

To ensure a successful horseradish harvest, adhere to these expert-approved dos and don'ts:

  • Do wait until after the first frost for maximum flavor concentration.
  • Don't soil your roots by pulling them from frozen ground.
  • Do harvest roots measuring at least eight inches for optimal quality.
  • Don't plant torn or damaged roots; choose solid, healthy specimens for replanting.

Storing Your Harvest: Best Practices for Flavor Longevity

Once harvested, horseradish needs proper storage to maintain its characteristic zest. For short-term storage, the roots should be cleaned and placed in a sealed plastic bag within the refrigerator. Those who wish to store horseradish long-term can employ techniques like placing the roots in moist sand within a root cellar or a sealed plastic bag with sand in the fridge. Each method helps maintain freshness while allowing the roots to age naturally, enhancing their flavor over time.

Common Misconceptions About Horseradish That You Should Know

Despite its popularity, many people hold misconceptions about horseradish that can hinder their harvesting success. One common myth is that horseradish roots should be harvested solely based on above-ground signals. In reality, the best moments for harvesting hinge on environmental cues rather than the plant's external appearance. Understanding these nuances can empower readers to make informed decisions and yield the best possible product.

Culinary and Health Benefits: Why You Should Get Into Horseradish

Horseradish is more than just a flavorful condiment; it boasts a portfolio of health benefits that add to its appeal. Packed with antioxidants and anti-inflammatory properties, horseradish can aid digestion and even may have cancer-fighting attributes. Incorporating this spicy root into meals not only enhances flavor profiles but also contributes positively to one's health. Its versatility in various culinary applications—from sauces to seasoned meats—illustrates its value beyond mere topping.

Preparing for Next Season: How to Propagate Horseradish

If you find success with horseradish this season, why not plan for next year? Replanting portions of the root can ensure continued production with minimal effort. Charlotte Welliver provides guidance on the significance of storing and correctly replanting sections of eight inches or longer for optimal future harvests. Timing and technique in replanting can make all the difference in ensuring a thriving horseradish garden come next fall.

Call to Action: Embrace Root Gardening with Horseradish

No matter your skill level, the journey of harvesting horseradish can be satisfying while enriching your culinary repertoire. Join the horseradish revolution and explore the joys of growing your own root vegetables!

Home Renovation & Project Planning

Write A Comment

*
*
Related Posts All Posts
08.14.2025

Rediscovering Retro Vintage: The Allure of 1980s Condo Renovation

Update Rediscovering Retro: The Charm of 1980s Condos The resurgence of retro design is making waves in the home renovation scene, and one captivating example is the transformation of a 1980s condo into a vibrant retro vintage home. This unique project highlights how the nostalgia of decades past can breathe new life into modern living spaces, blending old-world charm with contemporary functionality. Why Retro Style Matters Today As many homeowners seek connection to the past, retro styles are not just a trend but a means of expressing personal history. This condo renovation exemplifies this sentiment, where each corner resonates with memories of an era gone by while being adapted for current lifestyles. Retro designs often evoke a sense of comfort and familiarity, reminding us of simpler times while allowing for innovative updates that cater to today’s needs. Transformative Tips for DIY Retro Renovation Successfully executing a retro renovation involves selecting the right color palettes, furniture, and decor that echo the spirit of the 1980s without overwhelming the space. Here are some practical tips for those looking to elevate their spaces: Color Schemes: Emphasize vibrant hues such as teal, mustard yellow, and bright pinks—colors that were iconic during the 80s. Paint can dramatically change the perception of space and mood. Furniture Selection: Opt for pieces with geometric patterns and bold shapes that reflect the design DNA of the decade. Vintage furniture stores or online marketplaces often hold hidden gems! Accessory Choices: Incorporate accessories like retro lamps and artwork. Look for knickknacks that complement the color scheme and add authentic 80s flair. Social Engagement: The Community's Fascination with Retro Spaces This renovation is not just a private project; it's a conversation starter among local communities and design enthusiasts. Sharing before-and-after photos on social media has garnered discussion on how shared spaces can embody both personal and collective memories, resonating with those who grew up during the 1980s. Future Trends in Home Design: Balancing Past and Present As cities evolve, so does the concept of home. The blending of retro elements within modern architecture is likely to continue growing in popularity. This condo stands as a testament to how creativity, coupled with nostalgia, can create inviting living spaces that not only serve their purpose but also tell a story of yesteryears. Challenges and Opportunities in Retro Renovation While renovating a retro space can be exhilarating, it also comes with challenges, such as sourcing authentic materials and ensuring modern safety standards are met. Homeowners should approach such projects with a balance of enthusiasm and pragmatism, understanding the intricacies involved in blending old and new. Join the Movement: Why Not Try a Retro Touch? The retro movement in home design is more than just about aesthetics; it symbolizes a longing for deeper connections to our past. If you've been contemplating your home renovation, consider incorporating some retro elements. Not only does it allow for personal expression, but it can also bring warmth and character into your living environment.

08.14.2025

Why Thousands of School Buses Were Recalled: Critical Fire Risk Explained

Update Understanding the School Bus Recall: Safety FirstAs the start of the school year approaches, parents and students alike are preparing for the return of daily routines centered around school buses. However, for many, an unsettling reality has emerged: thousands of school buses have been recalled due to critical fire risks. The National Highway Traffic Safety Administration (NHTSA) has flagged nearly 17,000 buses manufactured by International Motors, LLC for brake issues that could pose serious dangers. This development is alarming not only for parents but also for schools and transportation officials.Identifying the Danger: How Do Electrical Issues Lead to Fire Risks?The NHTSA's findings reveal that the brakes on specific school buses contain faulty electrical components that could lead to fire hazards while the vehicle is either in operation or parked. The core issue lies with the brake pressure switch assembly, which, if it leaks brake fluid into the electrical system, can result in a devastating short-circuit. This risk is exacerbated during braking, a crucial function that should always operate reliably. Such hazards highlight the importance of regular vehicle maintenance and thorough inspections, particularly concerning school transportation.Which Buses Are Impacted by the Recall?If your local school district operates buses produced by International from 2016 to 2023, it is vital to be vigilant. The buses affected include the IC Bus CESB models spanning these years. Even schools that previously addressed this issue under an earlier recall (23V398) must ensure these repairs were comprehensive; they are still liable for the newer identified risks. The presence of faulty buses on the road could compromise the safety of hundreds of students daily, emphasizing the need for timely and effective communication from school districts regarding transportation options.Steps Parents Should Take: Immediate Actions to Ensure SafetyIn light of these developments, what can parents do to ensure their child's safety? The NHTSA advises against using affected buses until the specified repairs are completed. A proactive recommended practice includes parking any recalled buses away from structures and in open spaces. With notification letters expected from International in late September 2025, families should remain alert for updates. In the meantime, arranging alternative transportation is paramount to avoid potential dangers associated with the unrepaired buses.Future Implications: The Need for Regulatory Action and AwarenessThis recall raises crucial questions about regulatory measures in place concerning vehicle safety. As schools frequently depend on bus manufacturers for safe transportation, there is a pressing need for better standards and more rigorous inspections before these vehicles are deemed safe for student travel. Moving forward, it is imperative for legislation to mirror the innovation in school bus technology ensuring vulnerabilities are addressed promptly.A Call to Action: Facilitating Better Transportation ChoicesAs parents, guardians, and community members, staying informed and proactive in exploring alternative transportation options can foster safer travel for our children. Consider community initiatives that promote carpooling or other reliable transport avenues until all buses are deemed safe. Engaging in dialogues with school boards and local transport authorities can significantly enhance the conversation surrounding student safety.Conclusion: Navigating the Challenges AheadThis recall serves as a poignant reminder of the responsibility placed on school systems and transport manufacturers to prioritize student safety. Throughout these impending challenges, remaining educated, vigilant, and engaged will empower parents to make informed decisions regarding their children's transportation. We encourage all families to discuss the implications of this recall, voice concerns to school officials, and explore alternatives as necessary.

08.13.2025

DIY Guide: Easiest Way to Repair Your Driveway Cracks

Update Why Repairing Driveway Cracks Matters Maintaining your home's exterior can significantly enhance its overall aesthetic appeal and value. Often overlooked, driveway cracks can detract from your home’s curb appeal, suggesting neglect and potentially leading to more serious structural issues. By addressing these cracks promptly, homeowners not only improve their property’s appearance but also prevent more extensive repairs down the line. Understanding the causes of these cracks is the first step in ensuring your driveway remains in good condition. Identifying the Causes of Driveway Damage Before we dive into repairs, it’s essential to grasp why your concrete might be cracking in the first place. Several factors contribute to driveway deterioration: fluctuating temperatures can cause the concrete to expand and contract; moisture intrusion may lead to ice formation, which exacerbates cracking; and the natural wear and tear from vehicles can stress the material. Each of these reasons points to underlying vulnerabilities in your driveway's structure. Being aware of these causes enables homeowners to take proactive measures, such as regular maintenance and repair, to mitigate future damage. Step-By-Step Guide to Driveway Crack Repair The good news is that repairing driveway cracks is a straightforward DIY project that can be accomplished with just a few tools and materials. Here’s how to get started: Tools Required: Ensure you have a caulk gun, a chip brush, a broom or leaf blower, a pocket knife, a screwdriver, a shop vac, and a spray bottle at hand. Materials Needed: Gather backer rod, concrete crack filler, disposable gloves, sand, and a small dowel to complete the repair. Step 1: Begin by selecting the appropriate type of concrete crack filler for your project. Self-leveling fillers work best for narrow cracks, while non-sag fillers are better suited for larger, vertical applications. Knowing the difference will help you achieve the best results in your repairs. Preparing and Filling the Cracks Once you’ve chosen your filler, begin preparing the cracks for repair. Use your leaf blower or vacuum to clear out debris, ensuring a clean and dry surface. Weather conditions are also crucial—choose a day when the temperature is above 40°F and no rain is expected for at least 24 hours. After pre-cleaning, it’s time to fill in those cracks. Cut the filler tube appropriately and fill the crack just to the edge, allowing the filler to settle into place. For deeper cracks, consider using a backer rod to create a proper filling base. Understanding the Benefits Beyond Appearance Repairing cracks is not only an aesthetic consideration; it’s a valuable investment in your home’s longevity. Well-maintained driveways can boost your property value significantly, making your home more appealing to potential buyers. On a practical level, filling cracks prevents them from spreading, reducing future repair costs. By dedicating a few hours and minimal resources to this project, you can ensure your driveway remains sturdy and well-kept. Creative Solutions and Innovations in DIY Home Repair With advancements in materials and techniques, DIY home improvement has never been easier. For example, the use of eco-friendly concrete fillers is on the rise, appealing to environmentally conscious homeowners who wish to minimize their carbon footprint while maintaining their properties. Additionally, new formulations that set quickly are providing DIY enthusiasts with more options than ever, allowing for faster project completion. Final Thoughts: Your Driveway's Future Taking the time to repair your driveway cracks is a small project with a big impact. You'll improve your home's look and stability, which pays off in many ways. As you fix those cracks and keep your property looking top-notch, remember that regular maintenance can stretch the life of your driveway significantly. By continually assessing and repairing as needed, you're investing not just in your home, but in your peace of mind, knowing that you're ensuring the durability of your property for years to come. Take action today! Follow these simple steps to maintain your driveway and enhance your home's curb appeal. For more tips on home maintenance and improvements, join our community of DIY enthusiasts!

Terms of Service

Privacy Policy

Core Modal Title

Sorry, no results found

You Might Find These Articles Interesting

T
Please Check Your Email
We Will Be Following Up Shortly
*
*
*