Add Row
Add Element
cropper
update
Pro Home Guides
update
Add Element
  • Home
  • Categories
    • Home Design & Inspiration
    • Home Renovation & Project Planning
    • DIY Home Improvement & Repairs
    • Pro Contractor Insights & Business Growth
    • Technical Tips & Best Practices
    • Outdoor Living
October 10.2025
3 Minutes Read

Winterize Your Sprinkler System: The Essential Guide for Homeowners

Adjusting a valve on copper pipes for winterization preparation.

Essential Steps to Safeguard Your Sprinkler System This Winter

Winterizing your sprinkler system is no small task, but it’s essential to protect your investment and ensure your system works effectively come spring. Understanding how freezing temperatures affect your irrigation system can save you time and money in the long run. Each year, homeowners face costly repairs caused by frozen pipes, valves, and components if they fail to prepare properly.

Why Winterizing is Crucial

Freezing temperatures can wreak havoc on your sprinkler system. When water remains in the pipes, it expands as it freezes, leading to damage that can be very expensive to fix. By winterizing your system before temperatures plunge, you not only enhance the longevity of your sprinkler components but also ensure a smoother reactivation when spring arrives. As noted by experts like Skye Durrant and David McCary, proactive measures can prevent headaches in the upcoming gardening season.

Step-by-Step Guide to Winterizing Your Sprinkler System

Let’s delve into the practical steps required for a successful winterization of your system. Following these steps can help ensure your irrigation system is well-prepared for the cold months ahead.

1. Shut Off the Water Supply

Before doing anything else, locate the main shut-off valve, typically found in your basement or utility room. Turn off the water supply to halt water from flowing into your system. This is a foundational step in avoiding damages, and it sets the stage for the remaining steps.

2. Turn Off the Sprinkler Controller

To ensure your system doesn’t turn on accidentally while you are winterizing it, switch off the sprinkler controller. This simple adjustment protects both your system and reduces unwanted energy consumption.

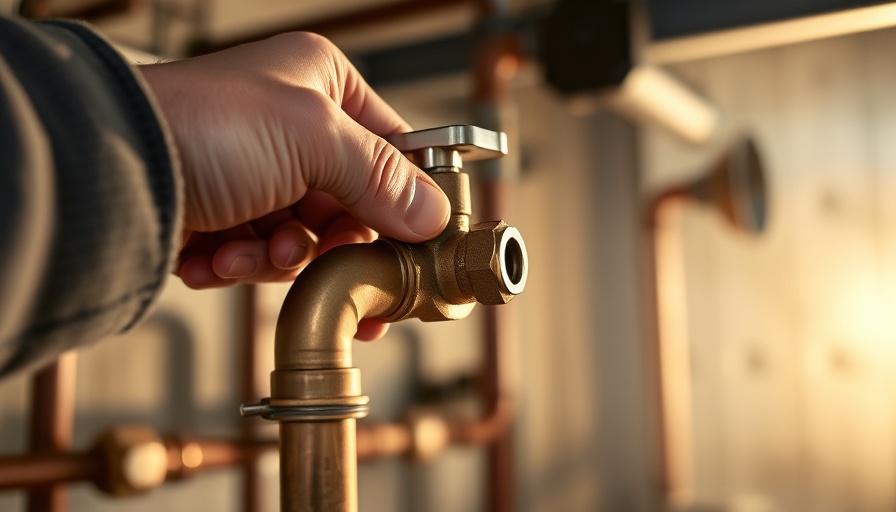
3. Drain the Backflow Preventer

Next, you’ll need to drain the backflow preventer. This component is crucial for ensuring that drinking water doesn’t get contaminated by the irrigation system. Open the test cocks and turn the shutoff valves to a 45-degree angle for drainage. If a drain plug is available, remove it, as this allows trapped water to escape effectively. Proper drainage in this area is critical, and as suggested, it might be beneficial to watch how-to videos for a hands-on understanding.

4. Blow Out the Sprinkler Lines

The next step involves using a high-capacity air compressor to blow out water from the sprinkler lines. By connecting your compressor to the system’s blow-out port, you can clear the pipes out effectively. Run through each zone manually to ensure that mostly air is escaping from the sprinklers, indicating that water is successfully removed.

5. Seek Professional Help if Necessary

If this is your first time winterizing your system, don’t hesitate to ask for assistance from a neighbor or professional. According to many experts, a poorly executed winterization process can be just as problematic as ignoring the task entirely. Having someone with experience guide you through the process could be invaluable.

When is the Best Time to Winterize?

Timing is everything. The right moment to winterize your system typically aligns with the first hard freeze or when temperatures start consistently dipping into the 30s.

Experts suggest that as soon as the growing season ends, you should aim to winterize. For regions with milder winters, it’s still wise to consider early preparation, as early winterization can result in healthier landscapes in the spring.

Reactivating Your System in Spring

Finally, after the cold months, when you’re ready to turn your sprinkler system back on, there are crucial steps to follow as well. Make sure to close any drain valves, slowly open the water supply valve, and check your system thoroughly for leaks and pressure. This regimen ensures that everything is functioning as it should before giving your garden a much-needed hydration boost.

Take Action Today!

Don’t leave your sprinkler system vulnerable this winter. Taking proactive measures to winterize will save you from potential costly repairs in spring. Equip yourself with the knowledge needed for effective winterization, and consider reaching out to professionals if you're ever unsure about any steps. Your lawn will thank you!

Home Renovation & Project Planning

Write A Comment

*
*
Related Posts All Posts
11.25.2025

Elevate Your Laundry Room with These Small Upgrades That Transform Space

Update Transform Your Laundry Room: Small Upgrades that Make a Big Impact For many of us, the laundry room is seemingly the most mundane space in our homes, a necessity rather than a point of enthusiasm. Yet, with just a few thoughtful upgrades, it can become a space that’s both functional and stunning—a true asset to our home. In this article, we'll explore several small laundry room upgrades that can make a significant difference not only in functionality but also in appearance. Whether it’s about being more organized or simply enjoying the aesthetic of this space, these tips will guide you toward creating a laundry room that aligns with your lifestyle and enhances your home’s charm. Create a Multifunctional Utility Sink One of the standout features that can elevate your laundry room's functionality is the installation of a utility sink. With it, you can efficiently pre-soak dirty clothes, wash delicate items by hand, or even clean up after messy crafts or pet grooming sessions. As noted by laundry expert Rebecca West, a deep farmhouse sink can even double as a bathing area for pets. With proper planning, this feature not only adds functionality but also infuses your laundry space with a sense of elegance and versatility. Invest in Upgraded Appliances The appliances typically serve as the backbone of any laundry room. Upgrading to modern washers and dryers not only enhances efficiency but can also reshape the aesthetic of the space. Matching sets in vibrant colors or with advanced features make doing laundry a more enjoyable task and bolster the overall look of the room. By selecting appliances that match your personal style, you can transform your laundry area into a cohesive part of your home’s design. Maximize Storage Solutions Storage is an essential element of any laundry room, especially if you’re working within a limited space. Think beyond traditional cabinets and consider solutions that optimize storage vertically. Installing tall cabinets that reach the ceiling can help utilize air space while also enhancing the room’s clean look. Additionally, incorporating open shelving above appliances can provide easy access to frequently used supplies. Baskets and organizational bins can consolidate smaller items, making your laundry routine smooth and efficient. As the organizing guru, Mary Cornetta highlights, the right storage keeps everything neat and accessible, lending you both practicality and peace of mind. Introduce Stylish Flooring The right flooring can completely transform the feel of your laundry room. Consider materials that are both waterproof and comfortable underfoot. Luxury vinyl tile is an excellent option due to its durability and variety of design aesthetics. For an upgrade that's both stylish and practical, radiant heat beneath stone or porcelain tiles can add a luxurious touch, particularly in colder climates. An inviting floor can make a daunting chore feel more like a part of a crafted oasis. Designate a Dedicated Folding Area Leftover laundry baskets full of clothes? A folding counter can change that ongoing cycle. Rebecca West recommends creating a dedicated space for folding laundry, which can be integrated into your design. This could be a standalone table, or even a fold-down countertop that saves space while ensuring that your laundry never piles up into a messy corner. This small addition can help streamline your laundry process, providing a designated spot for organization. Enhance Drying Space Options Air drying laundry not only saves energy but is also essential for certain items. Designating a space for a drying rack or even a ceiling-mounted drying option can make this process seamless. This adaptability is particularly valuable when handling delicate garments or wet sports gear that needs to be aired out. With innovative designs for drying and sorting clothes available today, this aspect of laundry care can be both practical and stylish. Explore Personal Touches with Design Finally, give your laundry room character by adding personal design elements. Lighting, paint colors, and decor can be easily overhauled to create a unique atmosphere. Creative wallpaper can make mundane tasks feel a bit brighter, while decorative shelves displaying plants or framed photos add a personal touch to the room. The laundry space doesn’t need to feel like a chore; instead, it can be an extension of your home’s personality and style. By implementing these practical insights, you can transform your laundry room from an afterthought into a charming and functional area that enhances your home’s overall appeal. Remember, effective upgrades don’t require a large budget or a long time; often, minor changes yield the most significant impacts. So roll up your sleeves and consider these enhancements—your laundry day will thank you! Call to Action: Ready to take the next step in home improvement? Check out our contractor marketplace at ProHomeGuides for expert assistance on your renovation projects!

11.22.2025

Are 50-Year Mortgages a Good Solution for Homebuyers' Affordability?

Update Understanding the 50-Year Mortgage: A Critical Analysis As home prices continue to soar and interest rates keep many first-time buyers out of the market, the conversation surrounding 50-year mortgages has gained momentum. The Trump administration's recent proposal to consider longer loan terms primarily aims to make homeownership more accessible. However, the question looms: Are 50-year mortgages really a viable option for prospective buyers? Let’s break down the numbers and implications. The Appeal of Longer Loan Terms In the face of high home prices and interest rates hovering around 6%, the idea of spreading mortgage payments over an extended time period, such as 50 years, holds an attractive allure. Emmett Dempsey, a licensed mortgage broker, explains that lowering the monthly payment could significantly aid buyers struggling with affordability. Currently, a typical $400,000 mortgage could cost about $2,106 monthly under a 50-year term compared to $2,398 for a 30-year loan. While this effectively eases cash flow for buyers, it introduces a larger problem: a dramatically increased total cost. The Math Behind Long-Term Mortgages The arithmetic involved presents a stark reality. Although 50-year loans can reduce monthly obligations, they also extend the timeframe over which interest accumulates. For instance, a 50-year mortgage on that same $400,000 home would result in roughly $1,263,600 paid over time. In contrast, a 30-year mortgage on the same amount would yield a total repayment of around $863,000. This disparity underlines a significant concern: the protracted duration of the loan means buyers would be paying off their homes well into their later years, potentially impacting financial stability. Potential Risks of Extended Mortgages Longer loans come with a host of risks beyond just accumulating interest. Experts caution that a 50-year mortgage could slow equity growth dramatically, as homeowners could find themselves owing more than their home is worth — a scenario that becomes increasingly concerning during real estate downturns. Additionally, the average first-time homebuyer is now around 40, meaning that a 50-year mortgage could extend their debt repayment until they reach 90 years old. This raises significant concerns about long-term financial planning and stability. Market Effects and Economic Implications While a 50-year mortgage could theoretically increase buying power, it may inadvertently fuel demand even further without improving housing supply, leading to an increase in home prices. According to industry analysts, if demand escalates but supply remains stagnant, the anticipated affordability gains from lower monthly payments would quickly dissolve. Counterarguments: Is It Really the Solution? The efficacy of the 50-year mortgage proposal is hotly debated. While it promises lower monthly payments, critics argue that this is more of a short-term fix than a long-term solution to the housing crisis. Some economists suggest addressing policy changes to boost housing supply to truly alleviate affordability issues. As noted by experts like Joel Berner from Realtor.com, "this is not the best way to solve housing affordability; we need to promote homebuilding and curb inflation." Conclusion: Weighing the Options In conclusion, the potential introduction of 50-year mortgages raises compelling points of discussion regarding homeownership accessibility amid rising costs. However, the increased total interest payments and slowed equity growth signal that this proposal might not be the silver bullet the housing market needs. As potential buyers evaluate their options, it’s crucial to consider both immediate financial flexibility and the long-term consequences of extended mortgage terms. Ready to explore homeownership options? Reach out to a knowledgeable mortgage broker to discuss your financial plans and find the right solution for you.

11.21.2025

Unlocking the Power of Rotary Tools: A Must-Have for Every DIYer

Update Exploring the Versatility of Rotary Tools In the evolving world of home improvement, rotary tools shine as some of the most versatile and efficient companions for both professionals and DIY enthusiasts. Whether you're a seasoned contractor or a weekend warrior tackling home projects, understanding the myriad of functions a rotary tool can perform will expand your capabilities and boost your creativity. Unleashing Creativity: More Than Just Tools Rotary tools have long been associated predominantly with tasks like carving, cutting, and sanding, yet their potential reaches far beyond conventional uses. From creating intricate designs on wood to wielding them as makeshift grinders, hobbyists and professionals alike have demonstrated that creativity knows no bounds. For example, an angle bracket affixed to a board can transform your rotary tool into a small benchtop grinder, elevating the precision of your tasks while keeping both hands free for more intricate work. Practical Use Cases Consider some practical use cases for rotary tools that serve diverse needs. For instance: Fixing Household Items: Repairing a rusted dishwasher rack or sharpening your chainsaw’s cutters can be accomplished efficiently with the right attachments. Creative Projects: Rotary tools can also shine during creative projects, such as carving decorative patterns on pumpkins or creating detailed engravings on glass. The right bits make all the difference in achieving the desired effect. Precision Repairs: When it comes to plumbing, these tools are invaluable for cutting through tough materials, like PEX piping, saving time and ensuring a cleaner project outcome. Safety First: How to Use Your Rotary Tool Wisely While rotary tools are incredibly versatile, they are also powerful machines that require proper safety precautions. Here are some best practices to keep in mind: Always wear safety goggles to protect your eyes from debris. Use appropriate gloves if working with materials that could cause sharp scraps. Make sure to work in a well-ventilated space, especially when working with materials like fiberglass that create dust. Future Trends in Rotary Tool Usage As technology and user expectations continue to evolve, rotary tools are likely to see enhancements in efficiency and versatility. Features like smart speed controls, energy-efficient motors, and longer battery life for cordless models will drive the future of rotary tools. With an increasing number of attachments and accessories designed for specific tasks, the rotary tool will become an even more indispensable feature in our toolkit, allowing for more complex and fine-tuned work. Final Thoughts: Your Next Step with Rotary Tools Engaging with your rotary tool is just the beginning. As you explore its capabilities, reflect on how you can integrate these tools into your projects—be it for practical repairs around the house or as a part of your artistic expressions. Embrace the journey of discovery and let your creativity flow! 🔧 For more tips on how to maximize your rotary tools, stay tuned to our upcoming features.

Terms of Service

Privacy Policy

Core Modal Title

Sorry, no results found

You Might Find These Articles Interesting

T
Please Check Your Email
We Will Be Following Up Shortly
*
*
*